FYI: I make my noodles as I go, so this recipe only includes directions for meatballs and tomato sauce. You should follow package directions for preparing your pasta.
I love Italian food. It is my favorite cuisine to eat and cook BY FAR. This is my go-to weeknight meal. I never get tired of it. I like a chunky sauce, so this recipe reflects that. If you don't, replace the canned diced tomatoes with canned sauce.
Meatball Ingredients
2 lbs ground turkey (for additional flavor, try 1 lb. of ground turkey and 1 lb. of turkey italian sausage, removed from the casing)
2 cloves garlic, minced (or 2 tsp of minced garlic, available in a jar in the spice or produce aisles of your grocery store)
2 large eggs
1 cup grated parmesan cheese
1 cup bread crumbs
1.5 tbsp. fresh italian flat-leaf parsley (substitute 2 tbsp dried parsley flakes available in the grocery spice aisle)
2 tsp.of salt (general rule of thumb is 1 tsp. of salt per pound of meat)
2 tsp. of black pepper
1.5 cups lukewarm water
1 cup of olive oil (for frying)
Tomato Sauce Ingredients
One 15 oz. can of petite diced tomatoes
Two 15 oz. cans of tomato sauce
One 6 oz. can of tomato paste
One medium sized white onion
4 garlic cloves, minced (or 4 tsp jarred minced garlic)
1/4 cup of olive oil
1 tbsp. fresh thyme, chopped (or 2 tsp dried thyme, available in grocery spice aisle)
2 tbsp brown sugar
Salt and pepper to taste (start with 1 tsp. of each)
Directions: Since your sauce needs to simmer to develop its flavors, let's start there. Chop your onion using a small dice. Here's an efficient way to do this. Next, mince your garlic. Heat a heavy bottomed pot or saucepan to medium high heat and add the oil. Once the oil starts to shimmer, add the onions and garlic and cook 5 minutes until softened. Then add the salt, pepper, thyme, and brown sugar and stir until combined. Cook for 3-4 more minutes. The brown sugar is added to balance the tart, acidic flavor of the canned tomatoes. I always make this sauce instead of buying jarred sauce because I can skip excess sugar and preservatives. I can't even remember the last time I bought a jar of spaghetti sauce.
Now the key to the sauce is its deep rich tomato flavor. You'll accomplish this by caramelizing the tomato paste. Stir the tomato paste in with the vegetables, thyme, and sugar and allow it cook until it turns a dark red color. You may need to reduce your heat a little here. You want to "brown" the paste a little bit without burning it. Tomatoes have a lot of natural sugar and sugar burns at high heat, not to mention the sugar you already added. Once the tomato paste has darkened, stir in your diced tomatoes and sauce and bring to a boil. Reduce to moderately low heat and simmer for at least 30 minutes, stirring occasionally.

While your sauce is simmering, you can prepare your meatballs. You'll need a large mixing bowl, a wide plate or pan sprayed with cooking spray or brushed lightly with oil, heavy bottom skillet with high sides (I always use cast iron), and tongs. Honestly, the less you handle this mixture, the more tender your meatballs will be. Since that's the case, I dump all of the meatball ingredients in a bowl, I spray my hands with cooking spray and I just dive right in and mix with my fingers. The spray keeps the meat from sticking to your hands. Also, your fingers apply less pressure to the meat than a spoon. First break the meat up with your fingers, then incorporate all of the ingredients until they are evenly distributed. This may feel and look gross, but trust me, it's the most efficient way to mix this large quantity of ingredients without overworking your meat. Overworked meat = tough, hard meatballs. Nobody wants to eat turkey flavored stones! Now, when you are working any meat, especially poultry, you want to protect against contamination, so wash your hands thoroughly with soap and water before you handle anything else. In fact wash them now.
Hey, you should check on your sauce and stir it at this point!
Next, spray your hands with cooking spray again or rub them together with a little cooking oil. Again, this is the prevent the meat from sticking to your hands as you form your meatballs. Dig back into the bowl and roll out your balls one by one, placing them on the oiled plate/pan you prepared earlier. The oil keeps your meat from sticking to the plate. I like to make large meatballs, so this mixture gives me about 25. The photo above shows what mine look like after I roll them out.
This might be a good time to check on your sauce and stir it!
Next, heat 1 cup of olive in your heavy skillet over medium high heat. Fry your meatballs until cooked all the way through, making sure to turn them for even browning. It takes about 8-10 minutes per batch. I use a large cast iron skillet and I can fit 8-9 meatballs in it a time, with adequate space in between. You don't want to crowd them. Crowding lowers the temp of the oil and causes your meatballs to soak up more oil than necessary. After the come out of the oil drain them in a large bowl or on a large platter lined with paper towels. Once you're done with your meatballs, stir and taste your sauce. You might want to add salt, pepper, or a little more brown sugar to adjust the flavor.
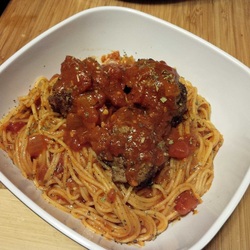
Now, some people, like to simmer their meatballs in their sauce. I'm sorry, but I don't. I just feel like, why would I go through all this trouble to get a beautiful sear on these meatball and then ruin it by sinking it in sauce? I usually make my pasta next, by boiling it in water flavored with seasoning salt and olive oil. The oil keeps the noodles from sticking together. I cook my noodles in a saucepan using very minimal water (usually half or 1/3 of the package directions for water). With pasta, it's always better to add water if it cooks out too quickly than it is to take water away from overcooked or oversoaked noodles. Once the noodles are just shy of al dente and the water has cooked out, you should have slick noodles with all of their starchy goodness. DON'T RINSE THEM!!!!! That starch serves as "sauce glue". Once the water cooks out, add your sauce and combine it with the noodles, cooking for 3-4 more minutes until the noodles are done. You should have perfectly seasoned pasta with a sauce that doesn't slide off. I usually spoon my pasta into a bowl, top with 2 meatballs and top those with a little extra sauce. Yuumy!
Hey, you should check on your sauce and stir it at this point!
Next, spray your hands with cooking spray again or rub them together with a little cooking oil. Again, this is the prevent the meat from sticking to your hands as you form your meatballs. Dig back into the bowl and roll out your balls one by one, placing them on the oiled plate/pan you prepared earlier. The oil keeps your meat from sticking to the plate. I like to make large meatballs, so this mixture gives me about 25. The photo above shows what mine look like after I roll them out.
This might be a good time to check on your sauce and stir it!
Next, heat 1 cup of olive in your heavy skillet over medium high heat. Fry your meatballs until cooked all the way through, making sure to turn them for even browning. It takes about 8-10 minutes per batch. I use a large cast iron skillet and I can fit 8-9 meatballs in it a time, with adequate space in between. You don't want to crowd them. Crowding lowers the temp of the oil and causes your meatballs to soak up more oil than necessary. After the come out of the oil drain them in a large bowl or on a large platter lined with paper towels. Once you're done with your meatballs, stir and taste your sauce. You might want to add salt, pepper, or a little more brown sugar to adjust the flavor.
Now, some people, like to simmer their meatballs in their sauce. I'm sorry, but I don't. I just feel like, why would I go through all this trouble to get a beautiful sear on these meatball and then ruin it by sinking it in sauce? I usually make my pasta next, by boiling it in water flavored with seasoning salt and olive oil. The oil keeps the noodles from sticking together. I cook my noodles in a saucepan using very minimal water (usually half or 1/3 of the package directions for water). With pasta, it's always better to add water if it cooks out too quickly than it is to take water away from overcooked or oversoaked noodles. Once the noodles are just shy of al dente and the water has cooked out, you should have slick noodles with all of their starchy goodness. DON'T RINSE THEM!!!!! That starch serves as "sauce glue". Once the water cooks out, add your sauce and combine it with the noodles, cooking for 3-4 more minutes until the noodles are done. You should have perfectly seasoned pasta with a sauce that doesn't slide off. I usually spoon my pasta into a bowl, top with 2 meatballs and top those with a little extra sauce. Yuumy!
 RSS Feed